What is Engineering Drawing | Basic of Machine drawing
Introduction to Engineering Drawing :
An engineering drawing, a type of technical drawing, is used to fully and clearly define requirements for engineered items.
Engineering drawing (the activity) produces engineering drawings (the documents). More than merely the drawing of pictures, it is also a language—a graphical language that communicates ideas and information from one mind to another.
Engineering drawing, is the most important aspect of mechanical engineering, as it is the fundamental need to develop the design and assembly of a machine. While the interpretation of a component in terms of sketching can be done in various methods, related to Descriptive Geometry, the three most necessary techniques of drawing/projection are:
- Orthographic Projection: In this method the object is placed in space in such a way that the front view of it is captured in the vertical plane, and the top view of the same, is captured in the horizontal plane. The projections of the object are perpendicular with the planar screen, and hence, the name ‘orthographic’.
- Perspective Projection: This is a simple technique of drawing an object as how one views it. The observer’s eye position, height, and the distance from the object, all influence the outcome of the drawing. Two sub-methods are adopted for this projection technique, namely, Visual Ray Method and Vanishing Point Method.
- Isometric Projection: This form of projection gives the total detail of the component under consideration. The basic principle behind isometric projection is that it involves the consideration of three axes that are inclined to each other making equal angles (thus the name since iso- means equal) with each other (120 deg). This is followed by transfer of actual dimensions to the isometric scale involving some basic trigonometric calculations.
Read More : Projection Method | First And Third Angle Projection | Difference
What is Engineering Drawing?
Engineering Drawing is the Language of Engineers. It is meant for communicating his/her ideas, thoughts and designs to others. A drawing drawn by an Engineer, having Engineering knowledge, for the Engineering purposes is an Engineering Drawing. Engineering Drawing is a starting point of all Engineering branches-Mechanical, Production, Civil, Electrical, Electronics, Communication, Computer Science, Chemical, Textile, Transportation, Metallurgical, Instrumentation, Automobile, Architectural, Agricultural, Aeronautical, Marine, Mining Engineering etc.
It is the Universal Graphic Language of Engineers, spoken, read and written in its own way. Every language has its own rules of grammar. Engineering drawing also has its grammar in the theory of projections, its idioms in conventional practices, its punctuations in the types of lines, its abbreviations, symbols and its descriptions in the constructions.
Students should not get confused Engineering Drawing with Artistic Drawing. The latter is commonly used by the artists for commercial purposes, such as in painting, advertisement boards, etc.
Geometrical Drawing:
Geometrical drawing is the foundation of all Engineering Drawings. It is a subject, difficult to learn or to teach without the aid of a good text book. A good speed in drawing work should be achieved, because “time is money” in the industry. Accuracy, neatness and legibility are of great importance in engineering drawing.
Geometrical Drawing consists of:
1. Plain Geometrical Drawing and
2. Solid Geometrical Drawing.
Geometrical drawing is the art of representation of geometrical objects such as square, rectangle, cylinder, cone, sphere etc. on a drawing sheet.
Plane Geometrical Drawing is the art of representation of objects having two dimensions, i.e., length and breadth such as square, rectangle, quadrilateral etc. on a drawing sheet.
Solid Geometrical Drawing is the art of representation of objects of three dimensions, i.e., length, breadth and height, such as cube, cylinder, sphere etc. on a drawing sheet.

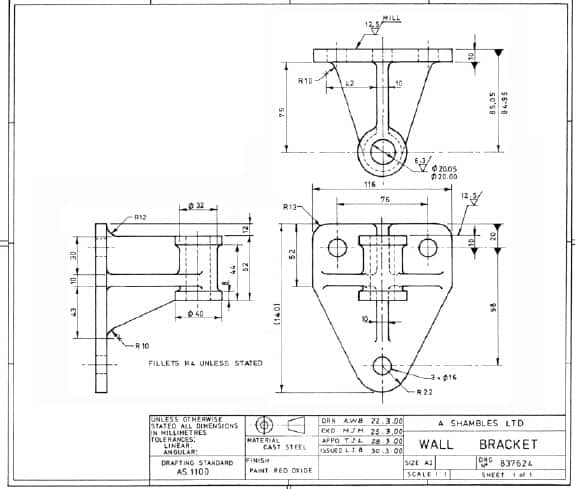
Detailed Engineering drawing should include following things :
Detail Drawings must provide sufficient information to enable the manufacture a part.
• Enough orthogonal views : enough views to adequate describe the component.
• Dimensions : Must be evenly distributed, structured and not duplicated.
• Scale : Drawing must state the scale used to fit the component onto the drawing sheet.
• The type of projection : Third Angle Projection is mandatory in ENGG1960.
• Drafting Standard (AS1100) : This is effectively covered in prescribed texts.
• The name or title of drawing : What is the name of the component ?
• The drawing number : What is the number (in-house system) of the component ?
• Dimensional units used : mm, m, inches, feet etc.
• Tolerances : What are the manufacturing tolerances for each part of the component.
• Surface texture (or roughness) : How smooth/rough each part of the component has to be.
• Treatments (coatings, tempers etc.) : Does the component need protective coatings ?
• Reference to assembly drawing : What does my component fit into ?
• Material : What material is the component manufactured from ?
• Drafter (who drew it), Checker (who checked it), Approver (who approved it) and dates
• Zones : Where on the drawing are you referring to ?
• Revision : What has been revised and why and what revision is this drawing ?
• Sheet Size : A4, A3, A2, A1 or A0
• Company : School of AMME, University of Sydney
• Sheets Reference (eg. Sheet 1 of 3) : When more than one sheet is required.
One thought on “What is Engineering Drawing | Basic of Machine drawing”
Leave a Reply
Recent Posts
Mechanical Engineering is an essential discipline of engineering encompassing many specializations, with each contributing its unique aspect to the dynamic and inventive nature of this field. With...
The Ram Lalla idol, which is installed at Ayodhya's Ram temple has many significant religious symbols from Hinduism. All 10 incarnations of Lord Vishnu are engraved on the idol. Notably, Lord Ram is...


Good work. Please provide the isometric drawing of the wall bracket shown in third angle orthographic projection. Thank you.