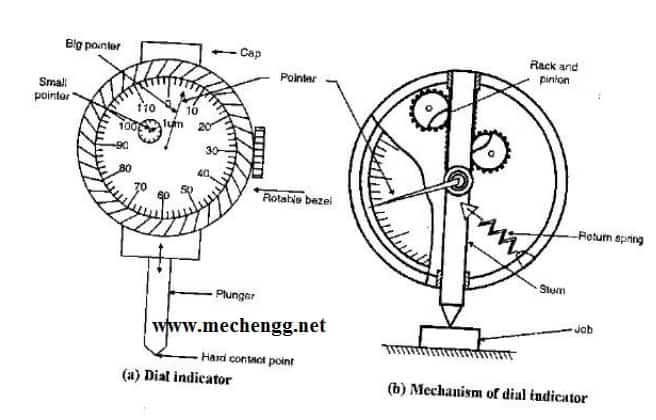
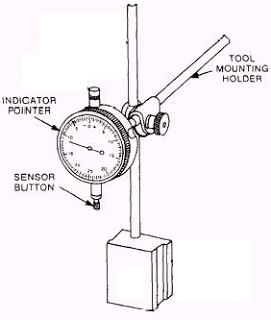
Dial Indicator is a very important comparator used in mechanical industrial measurement applications. in this article we will see how dial indicator works, parts, working principle, Construction of dial indicator, advantages, and disadvantages of dial indication.
Table of Contents
Dial Indicator:
Working Of Dial Indicator
Dial indicator Parts and Diagram :

MAIN COMPONENTS OF DIAL GAUGE
- Circular dial body
- Round graduated dial
- Pointer
- Gear train
- Lever
- Plunger

Types Of Dial indicators :
Types of dial indicators Several different types of dial indicators exist, differentiated by factors such as their size, connection method and the type of information featured on their face
- Balanced reading dial indicators
- Continuous Dial Indicators
- Reversed Balanced Dial Indicators
- Reversed Continuous Dial Indicators
- Test Dial Indicators
- Plunger Dial Indicator
- Lever Dial Indicator
Balanced reading dial indicators – Balanced reading dial indicators are so named for the way that information is arranged upon the dial’s face. Figures are printed upon the face of this dial running in two directions, starting from a zero in the center. Often, positive numbers are featured to the right of the zero and negative numbers to the left.
Continuous Dial Indicators – Continuously numbered dial indicators do not have the two sets of numbers featured on balanced reading dial indicators. The figures on this type of dial indicators run in one direction without stopping and without any type of a separation.
Reversed Balanced Dial Indicators – Reversed Balanced Dial Indicators are named because they have the same basic positive and negative scales to each side of a zero, but the positive numbers are to the left and the negative are to the right.
Reversed Continuous Dial Indicators – Reversed continuous, or counter-clockwise, dial indicators are the same as continuous dial indicators except that the numbers run in the opposite direction.
Plunger Dial Indicator – Plunger Dial Indicator also have a clock-like face but are characterized by the plungers mounted on one of their sides. One common use for plunger dial indicators is to measure the work of injection molding machines. The mechanism which allows this type of dial indicator to work is a rack and pinion, which changes the linear thrust of the plunger into rotary motion for the dial.
Lever Dial Indicator – Lever Dial Indicator are characterized by their lever and scroll mechanisms, which cause the stylus to move. This type of dial indicators are more compact and easier to use than plunger-type dial indicators and are therefore quite often used.
Requirements of Good Dial Indicator:
2. The pressure required on measuring head to obtain zero reading must remain constant over the whole range.
3. The pointer should indicate the direction of the movement of the measuring plunger.
4. The accuracy of the readings should be within close limits of the various sizes and ranges
5. The movement of the measuring plunger should be in either direction without affecting the accuracy.
6. The pointer movement should be damped, so that it will not oscillate when the readings are being taken.
Applications:
1. Comparing two heights or distances between narrow limits.
2. To determine the errors in the geometrical form such as ovality, roundness, and taper.
3. For taking accurate measurements of deformation such as intension and compression.
4. To determine positional errors of surfaces such as parallelism, squareness, and alignment.
5. To Check the alignment of lathe centers by using a suitable accurate bar between the centers.
6. To check the trueness of milling machine arbors and to check the parallelism of shaper arm with table surface or vice.

Measurement Science and Metrology Notes , Articles
Machine Tool Articles , notes , Interview Que & Ans
Mechanical Subjectwise Basic Concept Notes ,Articles
One thought on “Dial Indicator – Principle, Diagram, Working, Application”
Leave a Reply
Recent Posts
Mechanical Engineering is an essential discipline of engineering encompassing many specializations, with each contributing its unique aspect to the dynamic and inventive nature of this field. With...
The Ram Lalla idol, which is installed at Ayodhya's Ram temple has many significant religious symbols from Hinduism. All 10 incarnations of Lord Vishnu are engraved on the idol. Notably, Lord Ram is...


its easy more than my college.